Situation: You need to setup a site to site VPN tunnel between two SonicWall routers running SonicOS Enhanced.
Background: The first thing you need to decide about your VPN tunnel is whether to use Main Mode or Aggressive Mode.
- Main Mode is the most secure mode but requires that both endpoints have static IP addresses. The only time that Main Mode would not be the best choice is when one of the sites has a dynamic IP address or is hidden by a layer of NAT.
- Aggressive Mode is a less secure form that allows one or both sides of the tunnel to have a dynamic IP address or reside behind a NAT device. This mode leaves the network more vulnerable to DoS (Denial of Service) attacks as well as other security exploits.
The following instructions describe a Main Mode VPN tunnel. Instructions for Aggressive Mode will be added at a later date.
Main Mode:
Prerequisites:
- Static WAN IP addresses at both endpoints.
- Unique LAN subnets. (ex. make sure both offices are not 192.168.1.0/24)
- SonicWall appliances at both sites must be licensed for at least 1 VPN SA. (most new devices come with 10 SA licenses out of the box, but not necessarily older devices)
- Access to both routers at the same time is nice, but not completely necessary. It is possible to setup the first router then travel to the other router and set it up, but if anything goes wrong it can get very time consuming/impossible (router in another state/COUNTRY?) to travel back and forth. I would recommend setting up Global VPN client access first to both routers so that either can be configured from anywhere. As a last resort, open up the management ports from the WAN side for the duration of this project then close them when the tunnel is up. (make sure you have a strong password)
The Environment:
We’ll set this up for a fictional company with two locations that we will call East and West. Their info is as follows:
East:
- WAN Static IP: 70.80.90.100
- Sonicwall LAN IP: 10.0.0.1
- LAN Subnet: 255.255.255.0
West:
- WAN Static IP: 100.90.80.70
- Sonicwall LAN IP: 10.0.1.1
- LAN Subnet: 255.255.255.0
The Setup:
(Any settings not explicitly discussed are assumed to be left at their default values)
- Log into the Sonicwall at the first location. We’ll start at East.
- Go to the VPN Settings page and click “Add…” under VPN Policies.
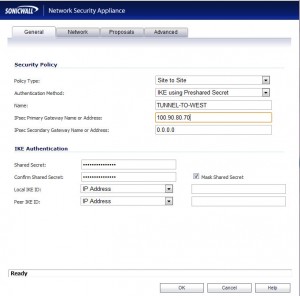
- First give the new policy a friendly name in the “Name:” field. We’ll call this one “TUNNEL-TO-WEST”.
- Fill in the WAN IP address for the West site in the box labeled “IPsec Primary Gateway Name or Address:”. In our example, that would be “100.90.80.70”. The “Secondary” Gateway box can be left blank or set to “0.0.0.0”.
- Come up with a very strong, long password to use as a shared secret and type it in the “Shared Secret:” and “Confirm Shared Secret:” boxes.
- So far you should have this:

- Now click the “Network” tab. This page gives you some control over which IP address ranges are visible from one side of the tunnel to the other. This could easily be customized so that only a certain address or range of addresses at East could access or be accessed by only a certain address or range of addresses at West. There are several ways to go about this, but I will show you the way I normally do it. The following steps will allow all devices at East to communicate with all devices at West and vice versa given the subnet information above.
- In the drop-down box labeled “Choose local network from list:” under “Local Networks”, choose “Create new address object…”
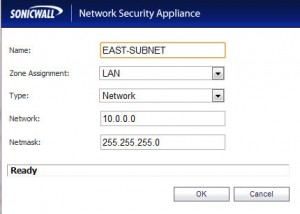
- Give the new address object a name. This address object will represent the portion of the local network that will be part of the VPN tunnel, so we’ll call it “EAST-SUBNET”.
- The “Zone Assignment” selection can be used to place the subnet in a particular zone to aid in more complex NAT/Firewall configurations, but for the purposes of this demonstration we will leave it set to “LAN”.
- Set the “Type” to “Network”. As mentioned in Step 7, you can really fine tune access to the VPN tunnel here. We will allow the entire local subnet to be accessed from the other site.
- In the field labeled “Network”, enter “10.0.0.0”
- For the Subnet, enter “255.255.255.0” (remember that these settings are from our fictional network, please substitute your own information!)

- Now do the same thing under the “Remote” section, but add an address object that represents the subnet at the other office. We’ll call it “WEST-SUBNET”, set the “Type” to “Network”, set the “Network” to “10.0.1.0” and the “Subnet” to “255.255.255.0”
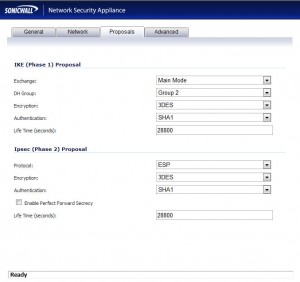
- Navigate to the “Proposals” tab.
- There are many options here, but we’re just going to make sure that the “Exchange” setting is set to “Main Mode”. If for any reason you make any of the other changes to the settings on this page, make a note of them. The VPN policy at the other office will need to be configured with the exact same settings.

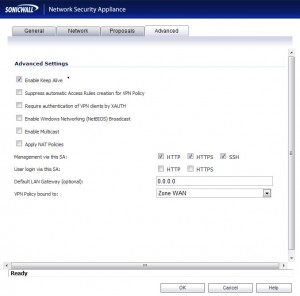
- Navigate to the “Advanced” tab.
- I normally check the option to “Enable Keep Alive”. This ensures that the SonicWall will constantly try to keep the VPN tunnel up, instead of only negotiating the tunnel when traffic bound for the remote subnet is detected.
- You also may want to enable some of the protocols next to “Management via this SA:” so that you can remotely access the management interface from the other office.

- At this point you can click “OK” to save the policy. You are done with this site.
- Now remote or travel to the router at the West office. You will literally repeat steps 1-20 substituting all of the information for the other office. Any of the settings that referred to an attribute of the East office should be set to the same attribute of the West office and vice versa. All other settings should be exactly the same.
- Once the policy is defined in both routers, try pinging a machine at the remote office. The first few packets will be dropped as the tunnel is negotiated, but you should start getting replies within 5-10 seconds.
- If the tunnel does not come up as expected, check the logs on both SonicWalls. The logs are very descriptive and will usually lead you directly to a solution.


No comment yet
3 pings
oscar says:
May 9, 2011 at 12:03 pm (UTC -5)
hOLA, para el “Modo agresivo” ha salido la publicacion del artículo???
Victorious says:
January 29, 2016 at 12:32 am (UTC -5)
Great Article with screen shots and very great explanation between “Main Mode” and “Aggressive Mode”
Thank you!
Victor
Cristian Mesaros says:
April 27, 2016 at 8:03 am (UTC -5)
Hi,
I have a question if we have many subnets and we want to connect full or more then one, betwen sites A and B. How we can do this? We can use Main Mode or is need to be in Aggressive mode. I will be happy if you can send me answer via email: cmesaros@gdssecurity.com
Thanks